
The Ultimate Guide to Making the Best Homemade Sandwich Bread
Decide to become a pro home baker today.
-
Watch the Video.
I’ve spent longer than I would care to admit on making the best possible video for helping others who want to learn how to make incredible homemade bread. Watch the video here, rewatch it, comment, subscribe, share it. You name it. Take advantage of my knowledge to bolster your own and to inspire you.
-
Buy the Ingredients.
To get started, buy the ingredients you need online or from local stores in your area. You don’t need much to get started, but you’ll never try if you never have the necessary ingredients or equipment. If you really love homemade bread and you want to make an effort to eat healthier bread, don’t be afraid to jump right in. I believe anyone can learn how to do this.
-
Try it out.
Experiment! It’s never too early to start trying something new. Depending on the level of complexity or the cost, you might have to start with baby steps. For example, before you take the plunge and buy a $300-$500 mixer, try making this recipe by hand first. Use what dough enhancers you can get your hands on, but don’t worry about the ones you can’t.
The Basic Recipe:
Main Steps for completing this recipe:
Add Wet Ingredients
Add Dry Ingredients
Mix and add in more flour or water until you have the perfect dough texture
Knead Dough (for 10 min. in a mixer, 20-30 minutes by hand)
“Window Pane" Test (to make sure your dough is done kneading)
1st Rise
2nd Rise
Bake at 350 °F or 180 °C for 30-35 minutes
Cool & Store
Ingredients for Three 9 inch x 5 inch loaves (or Four 8”x4” loaves):
3-4 fresh, large eggs (room temperature)
3 1/2 cups of lukewarm water/ 830 mL
1/2 cup of salted/unsalted butter (113.5g)
1/2 cup of vegetable oil (109g)
soy lecithin granules - 1 heaping TBSP (10 grams)
kosher salt - 6 tsp (30 g of Morton kosher salt)
dry milk powder - 6 TBSP (48 g)
white sugar - 1 cup (201 g)
vital wheat gluten flour - 5 TBSP (42.5 g)
vitamin C powder - half a pinch
all-purpose flour - 14-16 cups (~2000g)
instant or active dry yeast - 6 3/4 tsp (23.5 grams)
Ingredients for One 9 inch x 5 inch loaf:
1 fresh, large egg (room temperature)
1 1/6 cups of lukewarm water/ 276 mL
1/3 cup of fat (38 g salted/unsalted butter OR 36 g of vegetable oil)
soy lecithin granules - 1 teaspoon (3 grams)
kosher salt - 2 tsp (10 g of Morton kosher salt)
dry milk powder - 2 TBSP (16 g)
white sugar - 1/3 cup (67 g)
vital wheat gluten flour - 1.5 TBSP (15 g)
all-purpose flour - ~5 cups (~665g)
instant or active dry yeast - 2 1/4 tsp (8 grams)
The More In-Depth Recipe Coming Soon.
Watch the Youtube Video or read the video transcript for more detail.
Welcome to Ashley's Baking and Cooking.
Today I'll be sharing the ultimate guide to making the best homemade white sandwich bread. I've honed this recipe after making it over 40 times.
Baking bread is a tradition in my husband's family, so after I got married, I learned how to bake bread. However, I became very frustrated when I tried to learn, because I had to consult so many resources, and there wasn't a comprehensive guide anywhere. That's why I have put together this ultimate guide for making homemade bread, so others don't have to go through the trouble that I went through. I'll warn you, once you try this bread, store-bought bread will be ruined for you forever!
Let's jump right in.
Plan to spend about three and a half hours at home for this recipe, but you'll only need to work on the bread for an hour to an hour and a half.
To start, we're going to prepare our wet ingredients. The fool-proof way to making homemade bread is to add in your wet ingredients first, then your dry ingredients and your yeast on top.
To make homemade bread, you need a lot of moisture. This is what helps make the bread soft.
The wet ingredients we'll use today are water, eggs, butter, and vegetable oil.
When you're making yeasted dough, you want your ingredients to be as close to room temperature as possible, or a little on the warm side.
So while you're heating up your water or melting your butter, I like to put the 3 eggs we'll be using in the recipe today in a bowl of warm water. This just helps bring them closer to room temperature and speeds up the process if you're in a rush and you're trying to make this bread as quickly as possible.
Next, we're going to use lukewarm water. You can either get it from the tap, or you can heat it up in the microwave. You don't want your water to be too warm or it will kill the yeast.
So I'm going to put three and a half cups of water in the microwave for about 1 minute. Next, we're going to prepare our butter. So we're making 3 loaves of bread. So I'll be adding in 1 stick of butter or 1/2 cup of butter and about as much of oil. So I usually add in about 5 Tablespoons of oil or fat to each big loaf of bread.
We're going to place this butter in a microwaveable bowl and melt it in the microwave and let it cool down for maybe a few moments before we add it into our mixer. I like to put the wrapper over the butter so it doesn't splash in the microwave.
So I'm going to switch out the water and butter, we're going to check on our water. Perfect! It's just a little bit warm, so we're going to take that out and going to put the butter in. I usually put it in for about a minute, but you can listen to it and see if it needs to be turned off a little bit sooner.
So when I put my finger in the water it's the perfect temperature, it's not too hot. It's close to room temperature but a little bit warmer.
So we're going to take this out, the butter is melted.
So we're going to take the wrapper off, and throw that in the trash.
I'm going to pour the water in first, and then I'm going to add in the melted butter.
So now we're going to go grab our eggs.
I'm going to crack them straight into our mixer.
We are going to add in our 1/3 or 1/4 cup of oil now. Here's a fourth measuring cup, I'm going to pour oil into it.
When I'm adding ingredients, I like to usually put them away once I'm done so I know I have added the ingredient already.
Okay, so we've added all of our wet ingredients now.
Next, we are going to move on to our dry ingredients. We have a lot of dry ingredients here. There are some that are essential for making good homemade bread and there are some that we call dough enhancers. These dough enhancer ingredients will make your bread as good if not better than bakery bread. So if you're trying to impress family or friends, I highly recommend using these ingredients. I usually like to add in the ingredient that needs to dissolve in first, which is lecithin.
So this is probably the best kept secret in making homemade bread. This is a natural preservative; it also adds flavor to your bread. It's basically magic!
Since I have lecithin granules, I like to add them in with the liquid ingredients first so they have a little bit more time to dissolve. So I add in about a Tablespoon of lecithin granules. So you can kind of see, here's a big Tablespoon and I'll add it in.
So now that we've added in our lecithin, we are going to add in our other dry ingredients. I usually like to start with the sugar. I add in about a third a cup of sugar for every loaf of bread.
Next, I like to add in my salt because it's another essential ingredient. The salt really goes a long way in helping maintain the structure of the bread. It kind of controls the yeast so the bread doesn't rise too quickly, and of course, it enhances flavor.
We're going to add in 2 teaspoons of salt for every loaf of bread.
Here's one teaspoon, one...
And six.
Next, we'll add in dry milk powder. In a lot of sandwich bread recipes, you'll see one of the main ingredients is milk. I actually prefer the taste of the bread when I use more water then when I just use milk.
We'll be adding in 2 Tablespoons of dry milk powder for every loaf of bread. So that will be 6 Tablespoons total in this recipe.
Now we'll be adding our vital wheat gluten, another vital ingredient. Vital wheat gluten is truly one of the most important ingredients if you're trying to make the best homemade sandwich bread.
Vital wheat gluten is what makes the bread elastic and really helps shape your loaves into these beautiful big, fluffy, light loaves.
You can use bread flour which has extra gluten flour in it, but I actually prefer using gluten flour and all purpose flour with it, because every bread flour is made different, and the percentages of gluten vary.
We're going to add in a little bit less than 2 Tablespoons of gluten flour for every loaf of bread, so I'm going to be adding in about 5 Tablespoons to this recipe.
As long as you know the ratios that should go into each loaf and how many loaves you are making, the measurements don't actually have to be exact. You'll find the better you get at this, the easier it will be to make.
We're almost there. The final dough enhancer ingredient I would recommend but maybe is the least essential out of all of these is Vitamin C powder or some type of acid such as lemon juice or vinegar. You just need a little splash or a tiny little half pinch, but it will help preserve the bread.
You need to beware, if you add too much in, the Vitamin C powder or the acid that you use will counteract the gluten and your bread might not hold together well enough, and it might flop instead of rise.
So we're going to add in just half a pinch.
Great, we only have 2 ingredients left. Flour and yeast. I like to add most of my flour first, and then the yeast, mix the dough, and add in flour until I get the right texture of dough.
This is something a recipe book or magazine can't show you. That's why I'm going to show you today the perfect dough texture you need to make the best bread.
So I'm going to take this flour and I'm going to add in about 12 cups of flour. Recipes will often tell you to spoon flour in or weigh your flour, but by adding in a little bit less flour than you actually need, you'll have a little bit of buffer room and can in extra flour as needed until you get the perfect dough texture.
12 cups of flour, awesome.
So what you don't want to forget is your yeast at this point, you've added in everything else except your yeast. I have made the mistake several times of forgetting one ingredient or adding too much and it messes with the whole bread. Do whatever you need to so you don't forget any ingredients. Each one is an important part of the bread and if you omit one or change it in a drastic way, your bread will probably not turn out very good. But don't worry, if you mess up, don't give up. I've had plenty of failures, but by persevering through them, I've been able to perfect this recipe.
If your yeast is over 6 months old or it hasn't been refrigerated, you might want to get new yeast for this recipe.
I like to add in a little bit over 2 teaspoons for every loaf of bread.
1...
It will help your dough if you don't have the yeast touch any liquid ingredients. When you're adding in your flour, make sure to cover all of your liquid so your yeast will only be touching dry ingredients.
Now it gets to the fun part! If you don't have a mixer, that's okay. You can just mix these ingredients by hand in this same order in a big mixing bowl, and then I'll take a little bit of this dough from the mixer and show you how to knead it by hand. I'm going to show you how to do it in the mixer. This is by far the easiest and fastest way to mix your dough. So I'm going to put the lid on.
And plug in our mixer, and we're going to use the mix speed or the 4 speed - the fastest speed to mix these ingredients in. So I'm just going to mix it.
So once it looks like it's been mixed pretty well, you're going to want to take the lid off. And you'll look at this. It's starting to come off the sides of the bowl, but it's still pretty wet. So if I touch it with my finger, you can see it, there's some residue. So this means it's still a little too wet, we expected that. We're going to add in probably another 2 cups of flour. So what you're going to want to look for is the dough is forming one smooth lump. It might be all around the mixer but it's smoother than this, and then it's coming cleanly off the sides.
So we're already starting to see that, but there's still some residue on the sides as well. So we're going to add in another couple cups. Plop that back in. Put the lid back on.
And we're going to mix it again. So I'm going to pause for a second and show you what the dough looks like. You can see it's not quite mixed enough, but it is coming off the sides really cleanly. So we're going to mix it a little bit longer and see if this is a good amount of flour or see if we need to add a little bit more flour or a little bit more water.
Okay, we're going to pause it again. Look at how nicely that is coming together. It's a lot more cohesive. It's still wet, right? You don't see flour anywhere, and if I do the finger test- no residue.
So I think this dough has the right amount of flour and water moisture. This is what you're looking for. I'm going to let it knead now. I've cleaned my work station and floured the counter. I'm going to now show you how to knead your bread in the mixer or by hand. I've also removed my wedding rings because I don't want to get any dough stuck on my jewelry.
So I'm going to take a little bit of dough from our mixer. We'll take about this much. And we'll leave the rest in the mixer to knead. So I'm going to put the lid back on. If you have a newer Bosch mixer, I recommend kneading at the 2nd setting. If you have an older Bosch mixer or a Kitchen Aid, try to do it closer to the lowest setting. So we're going to set a timer for 10 minutes...
I'll show you now how to knead dough by hand. There are a million videos on this, but this is how I like to do it.
I just like to think you're stretching, trying to stretch the dough, you're not trying to break it. You don't want to do this. You can see right now, before the dough is kneaded, if you try to stretch it, it will break.
By the time we're done kneading this dough, the bread won't break when we stretch it out, it will stretch and become a really thin layer.
The gluten needs to be worked, it needs to be developed so the bread will be strong enough when the yeast adds air to the bread, essentially, the bread will be strong enough to hold its shape.
So I like to kind of roll it out and stretch it out with my palms and use my whole upper body so it takes less work.
So if you're kneading your dough by hand, it will definitely take longer than to knead it in the mixer.
One of the common mistakes that more amateur bakers make is they don't knead their white bread enough.
If you've added in too much of one ingredient or too little of another, it doesn't matter how much or too little you knead your dough, it won't come out well.
If you're added in the right amount of ingredients, then you don't have to worry too much about over-kneading your dough.
In a mixer at a lower speed, it will be about 10 minutes is how much I've found works well. If you knead it up to 15 minutes, that shouldn't be too much, but if you knead it less than 8 minutes, your dough might not be kneaded enough, your gluten might not be strong enough and your bread might flop.
Since I'm able to work such a small amount of dough like this, I can probably finish kneading it in about 10 minutes. However, if you are working 1 full loaf or 3 loaves by hand, it might take you more like 20, 25 minutes. It just depends on how strong you are, haha.
Great, so we've finished kneading this dough. So we're going to let it rest for 1 minute, and then I'm going to show you the window pane test. The window pane test is you'll stretch out your dough and see if the gluten strands have been developed enough that it will hold the dough together and not break like we saw before the dough was kneaded.
If you can't do that successfully, that means you haven't kneaded your dough enough or something else is wrong. So I would recommend continuing to knead.
A minute's up! We are going to take a piece. I like to take maybe a golfball (size) piece, and we're going to pretend this is a little pizza. If you've ever made pizza, you're going to kind of gently, stretch out the dough like this. And now, when you hold it up to a source of light, you can see the light through it. It's okay if it tears a little bit, but it needs to mostly hold its form.
Great, now that this dough has passed the window pane test, we are going to check our dough that was kneaded in the mixer.
Beautiful!
So I'm just going to take a little piece of this, it's rested for at least a minute now. And we are going to start holding it up to the light. Look, this is gorgeous! This has definitely passed the window pane test.
So now we're going to spray our bowls, divide the dough into 2 bowls, preferably metal or glass, spray the tops, cover them with saran wrap, and put them in a warm oven to rise. We're going to check on them in about an hour to an hour and a half and take them out once they've doubled in size.
Now I'm going to put them in the oven. So the side's are not too warm so it won't burn the plastic, it's good to check! It won't burn the bowls. But it's just warm enough that it will help them rise faster.
It's been about an hour now and we're going to go check on the bread. Come on!
Great, so these have doubled in size! So we're going to take them out and prepare them for their second rise.
As you can see, our dough has doubled in size. These look amazing. I'm going to do the big reveal so you can see how good these are already looking. Remember, to save your saran wrap. We're going to use this to cover the dough again for the second rise.
So as you can see. Wrapping these in saran wrap and adding a little bit of moisture with the oil has helped keep the dough moist. If it's developed a dry skin that's okay, but not ideal.
Next, we're going to divide the dough and put it into these 3 pans for the 2nd rise. We're going to spray them first.
This recipe makes 3 loaves in 9 by 5 inch bread pans.
I have found from trying a lot of different options that spraying the pans is most convenient and it also works the best.
Normally, I like to divide the dough by using a kitchen scale and measuring it and dividing it equal[ly] into three parts, but today I'm just going to show you how to eyeball it.
So as you can see, this loaf on my right, your left is going to be bigger than the other two. I think that's going to be great. Sometimes it's nice to have different sized loaves because they fit in different sized bags. We're just going to leave it as is and see how they turn out.
What we'll do next is spray the tops of these loaves because sometimes they get sticky, and we'll cover them again with our handy-dandy saran wrap.
Once your bread loaves have been covered with saran wrap, you are going to put them in a warm place for the second rise. They'll probably just need 10, 15, 20 minutes. Once they are over about an inch over the edge, you want to put them in a warm oven to bake. You want to leave them in a warm place outside your oven or close to your oven so your oven can be preheating to 350 degrees Fahrenheit. I'll include Celsius here (180 degrees Celsius.)
So we are going to start preheating the oven and we'll let these sit and rise.
Our 3 loaves have risen and they are ready to go into the oven. Once you take the saran wrap off, you'll want to bake them for about 30 minutes until they are golden brown on the outside and they pass the knock test.
Obviously, this loaf was a little bit bigger to start with so it's risen a lot more, but they've all risen at least an inch above the edge of the pans.
Now we set a timer and wait.
Our bread has been baking for almost thirty minutes, so we're going to check on it and see if it's ready to take out.
Oooh, that's looking pretty darn good. We might give it 3 more minutes and then take it out.
Okay, they look ready to take out.
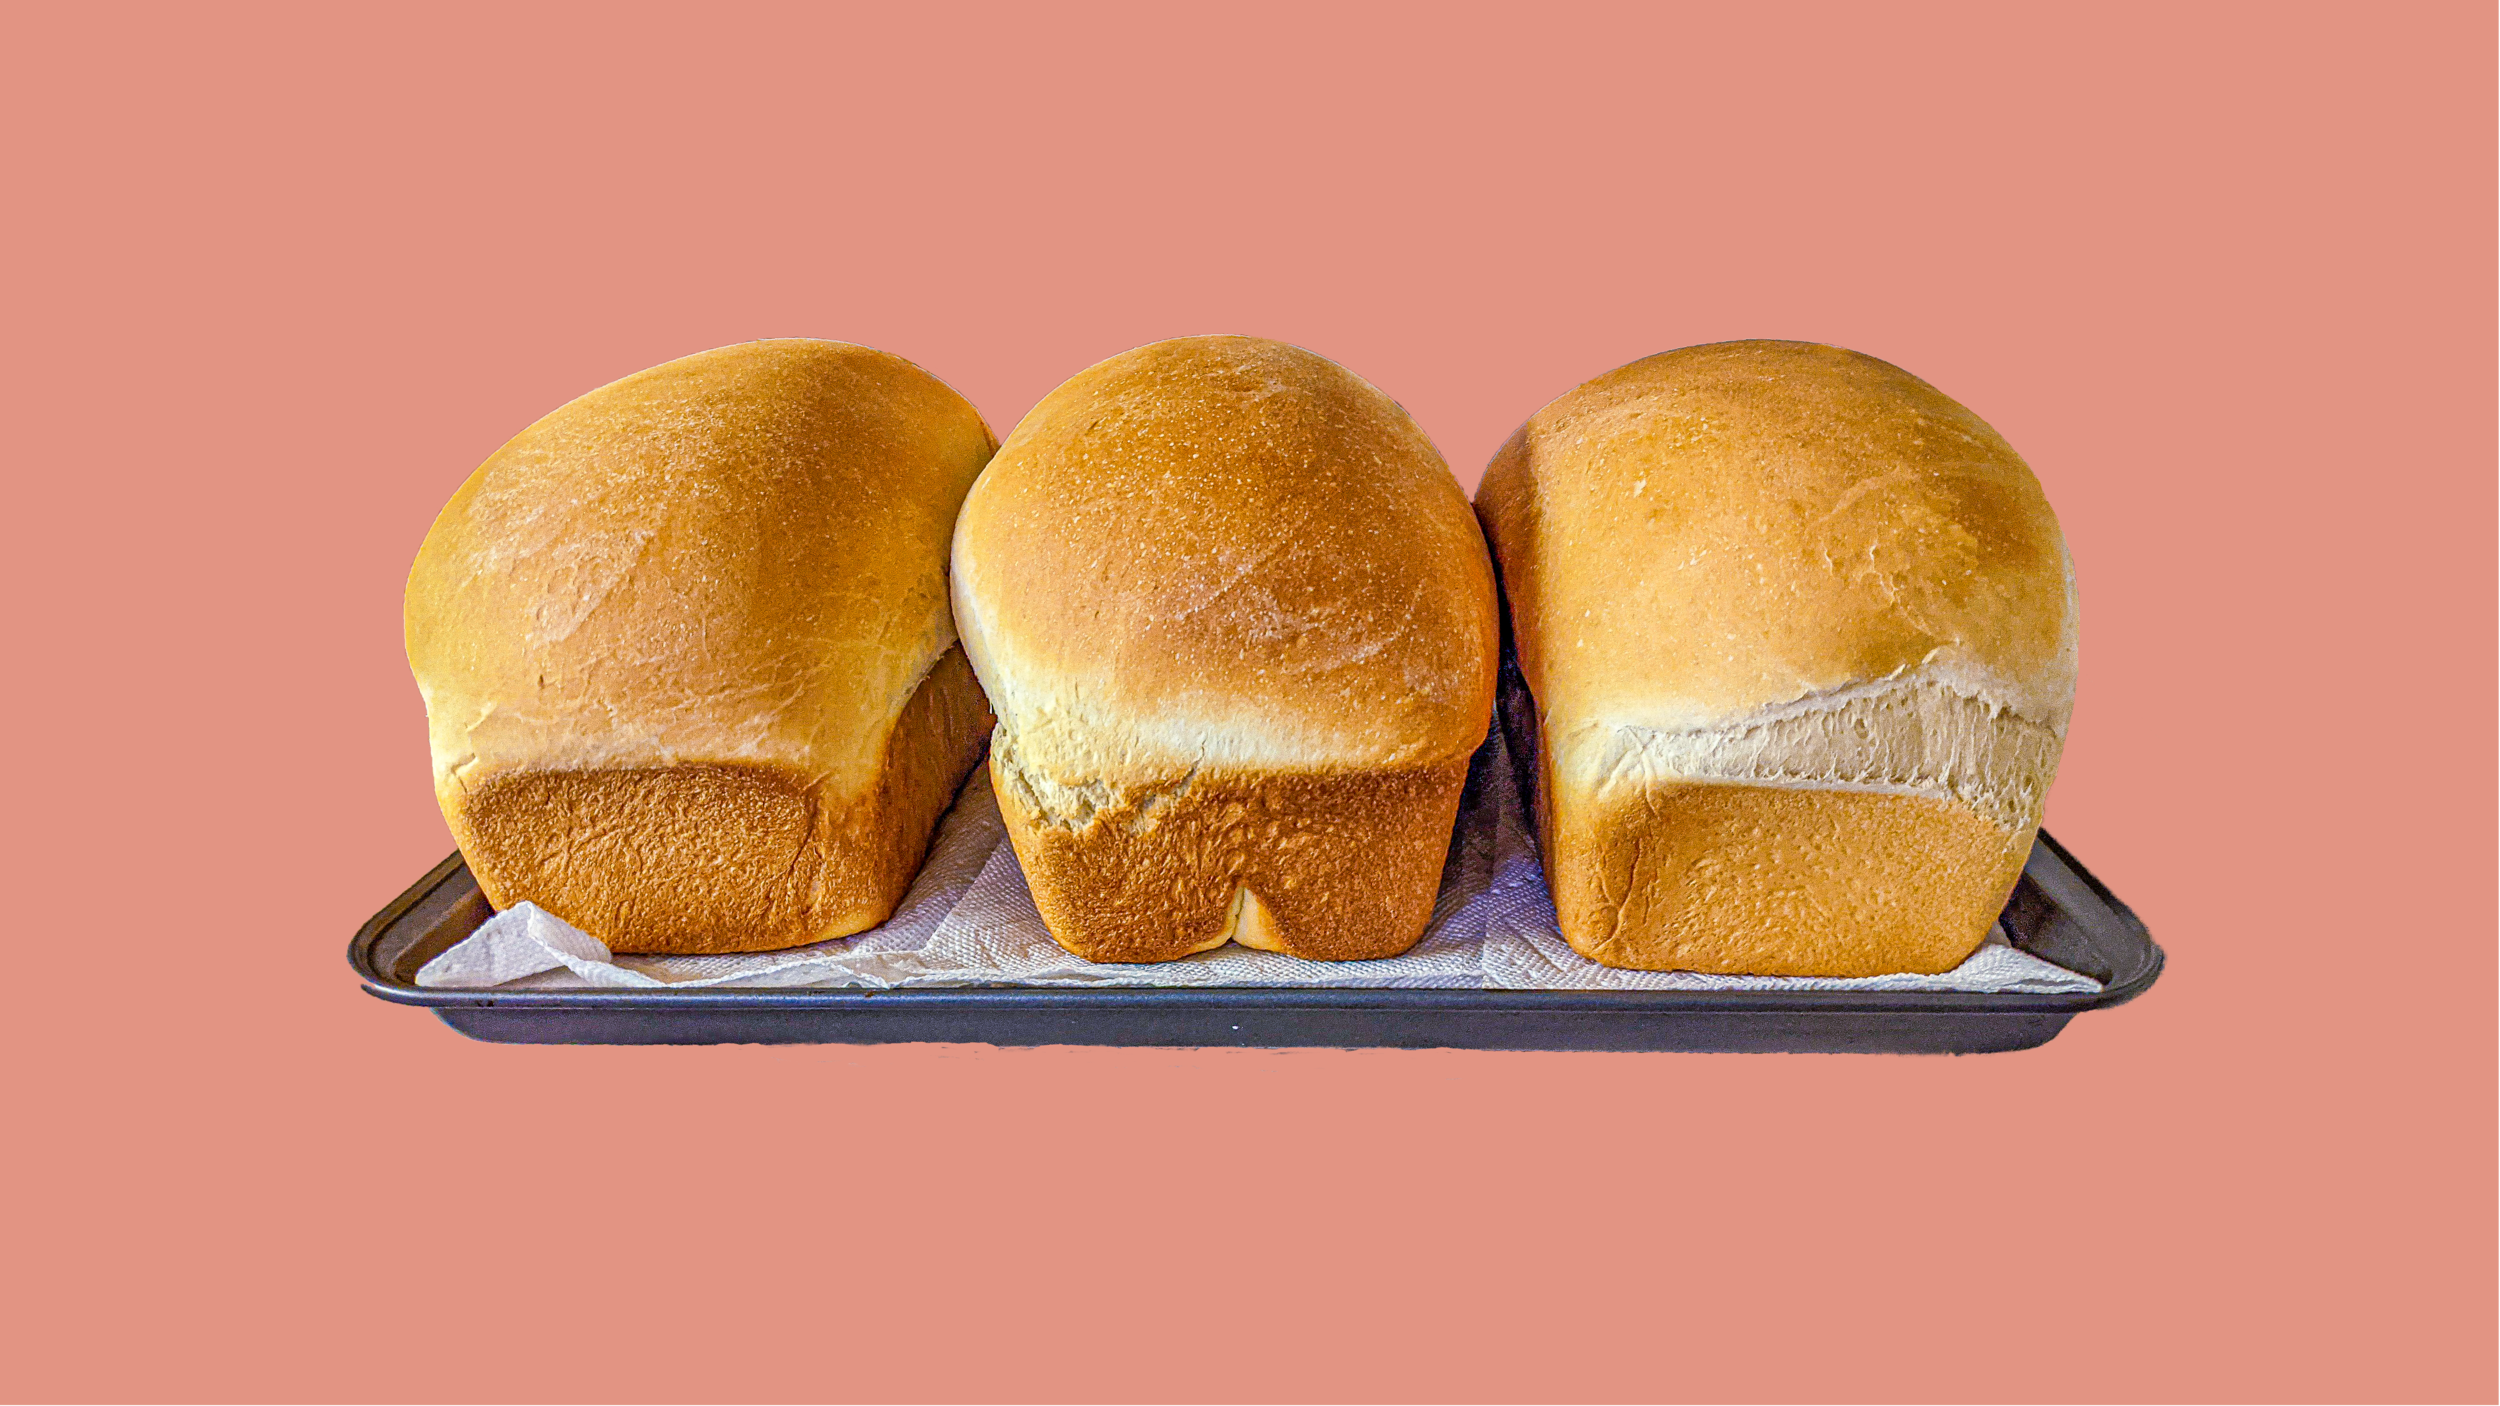
Look at this amazing bread!
So to make sure your bread is done, one thing you can do is what I call the knock test. You can knock on the loaf and make sure it holds its shape and you can hear that really nice hollow-ish sound.
What you don't want to do is leave your bread in the pans too long once they're done baking. So what I like to do because I'm poor and I don't have [cooling] racks, is I put the bread on paper towels on my counter for 10 to 30 minutes, however long they need until they are closer to room temperature and I put them in plastic bags.
I'll show you how I take them out really quick and I'll show you the final result of the bread and what it looks like. When taking the bread out of the pans, you obviously want to use gloves, and I tip it over just slightly. But I don't want it to fall on the top, because then it will be crushed a little bit. But if you let it fall on its side like that, it will stay nice and intact.
If you want that extra shiny look, you can coat a little bit of extra melted butter on these loaves, but I think the loaves already look beautiful and they already have enough butter.
Number 2.
And... 3.
Voila! C'est fini.
If you like this video, please subscribe. I'll continue to add my favorite cooking and baking tips and tricks to this channel every month.
If you have something you'd like to see me make, or any questions or suggestions, please add them in the comments below.